CQ5 Workflow Tutorial Part – II
In my last post you got a lot of information about CQ5 workflow basics. If you don’t remember all of them then not to worry about that I will use all those term in this series of tutorial.
Agenda of this post
- Introduction to Process Step.
- Use of Inbuilt Processes through this Step.
- Use of Auto Advance Handler.
- Terminate a running Workflow Instance form workflow dashboard.
Let’s start with that. In my last post we create a demo workflow model named as “blog”. Let’s continue with that.
Go to Workflow Dashboard -> double click on blog model
your screen looks like –

right click on Step 1 (participant step) and delete this step from your model. Select Workflow tab in you sidekick, when you scroll down you will see a Process Step there just drag and drop that step on to your workflow model. Double click on this step you will get a screen as –
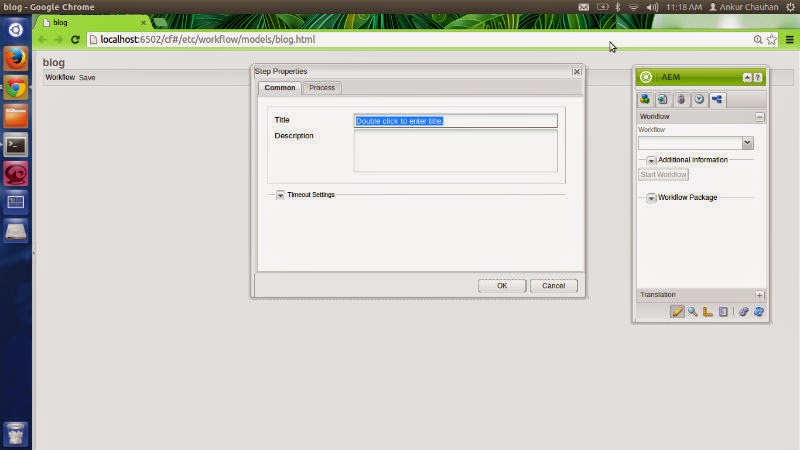
In this dialog there are two tabs
- Common
- Process
Common tab contains the properties common to almost every workflow step or process step as title, description. Here you have three properties Title, Description & Time Out Settings.
I will take Time Out Setting in a separate blog as it’s very useful while working with custom workflow. Till now you can think it as when the selected time has been expired then Timeout Handler process executes.
Process tab is our main concern Let’s talk about that. This tab consist three fields
Process, Handler Advance & Arguments
Process
This field provides a list of all currently available process in this drop down field.
you can add your own custom processes as well, I will create a custom process in my next post in this post I will use a in built process named as “No Operation(Script)”, Just select this process.
No Operation process does nothing i.e. it is blank process it doesn’t effect any thing on your page or in content repository.
Argument Text Area represents the input arguments to this process step, I will show you how this field will be used use in my next post where I’ll show you, how to create custom workflow process. Till then just leave it as blank.
There is a CheckBox named as Handler Advance. This checkbox box tell the workflow instance to move into next step when current step has been finished.
If you doesn’t select it then after completion of this step your workflow doesn’t move to next step. It means it will not transfer control to next step in the workflow.
First test this process step with selected checkbox.
Click OK on your Dialog window then save your workflow model by clicking Save button(top left corner).
Click OK on your Dialog window then save your workflow model by clicking Save button(top left corner).
Go to your /content/geometrixx/en.html page and in Sitekick go to workflow tab. Select blog workflow model and click on start workflow model.
You will see nothing will happen and your selected workflow field becomes blank it means your workflow has been completed successfully & if you configured your mailing service then you will get a workflow completion mail in your configured email id.
I will show you, how to configure email service when I will teach you, how to deal with email process step. It will be explained in detail in coming post.
Now go to your workflow model screen and in the process step just uncheck Handler Advance checkbox. then Click OK on your Dialog window then save your workflow model by clicking Save button(top left corner).
and again on your /content/geometrixx/en.html page hit your workflow then you will get a screen as –
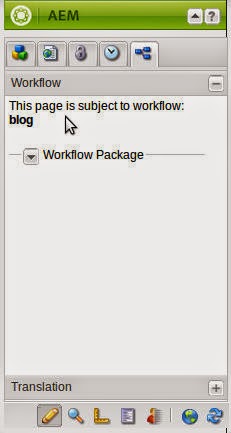
Notification Message
This page is subject to workflow: <Workflow Name>.
It means your process step is completed but it doesn’t advance control to next step so that your workflow doesn’t completed.
So in every process step you must have to check this checkbox.
My Observation
Till now, I don’t know any scenario where this checkbox will be useful but right now it is a key point in every process step.
For checking your workflow that it’s still running just go to your workflow dashboard. Select instances tab.
You will see a running workflow instance. Now you have to terminate your running instance as it will not be completed by it’s own.
If you don’t terminate this running instance, you are not able to start another workflow on same page as at a time a page can be a part of only one workflow instance.
you can terminate by right clicking on the running instance or by clicking on terminate button after selecting a running workflow process. your screen looks like-
you can terminate by right clicking on the running instance or by clicking on terminate button after selecting a running workflow process. your screen looks like-

Now refresh your /content/geometrixx/en.html page & this notification message becomes removed.
Happy Coding
Namah Shivay
Recent Comments